Open a new image, 200 x 200, transparent background. Flood fill this image with marb011. Add the border just like you did for your picture, bevel and all. You should now have two images ready to be placed on your plaque.
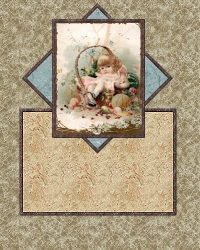
Open a new image, 400 x 500, transparent background. Copy your framed marble image ("Ctrl"..."C") and paste it onto your new image as a new layer. ("Ctrl"..."L") Rotate this layer (image...rotate) 45 degrees to the right. Sharpen once. (image...sharpen...sharpen) *NOTE: Do NOT rotate this image until you have pasted it onto your new image. Paste as a new layer first, then rotate, then sharpen. Now copy your framed picture ("Ctrl"..."C") and paste it onto your new image as a new layer on top of your framed marble layer. ("Ctrl"..."L") Use the mover tool to position both layers. Make Layer 1 active. Flood fill with marb046. Open a new image, 300x200, transparent background. Flood fill with marb006. (Text shows up better on the finer-grained marbles.) Add your border to this image just like you did on your picture and other marble image. Copy and paste this image as a new layer right above layer 1. Use your mover tool to line it up. You should now have an image that looks something like this: (size reduced for faster loading)
Yeahsuh! We're almost there! Stay with me, now. Follow wompie! |