Open a new image, 500 x 800, transparent background. *Add a new raster layer.* Load your Victorian box
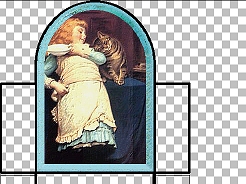
selection...selections...load from disk. (*NOTE* The PSP6 version won't fill the words "glue" as well as the PSP7 version. I just typed in the words when I made the box in PSP6.) (*RE:NOTE* If you are using the PSP6 selection, simply expand the selection by 1 pixel. Selections...modify...expand) De-select. ("Ctrl"..."D") Use your magic wand tool to select the top arch by clicking inside the arch. Save selection to Alpha Channel. (Selection...Save to Alpha Channel) Open your picture. Load selection from Alpha Channel. (Selection, Load from Alpha Channel) While it is still selected, copy to clipboard. ("Ctrl"..."C") Minimize your picture. Go back to your Victorian box selection image. Paste picture selection as a new layer. ("Ctrl"..."L") Use your mover tool to position the selection in the upper arch. You image should look like this: (image size reduced for faster loading)
Now, paste picture once more as a new layer. ("Ctrl"..."L") Flip the selection. (image...flip) Use your mover tool to position the flipped image in the lower arch. Now, we will add a border to our images. If you have BladePro, use it. If not, you want to use a pattern fill. You can find tiles here or visit Jane's site here for beautiful background fills. Go to your layer palette and make sure the
Victorian box selection layer is active. Use your magic wand tool to select the upper
arch. While it is still selected, add a new raster layer. Drag this layer above your
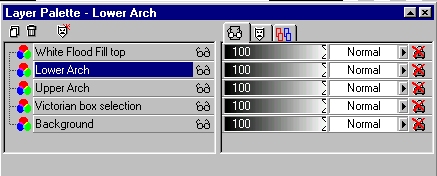
picture layers. My layer palette looks like this: Make sure your "White Flood Fill top" layer is selected in your layer palette. Flood fill with white (if using BladePro) or you chose a tile or background fill. I used Arizona Azure preset. While it is still selected, go to selections...modify...contract. I contracted 15 pixels, but you can adjust as needed. Hit "Delete." You image should now look like this: (image size reduced for faster loading)
Repeat the selection, new layer, flood fill, etc. on the bottom arch image. Now let's add some color to the bottom and sides of the box. Follow wompie! |