|
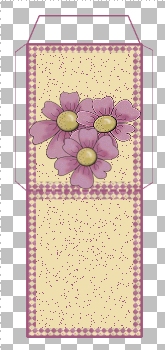
Paint your tube "wompiecountryflower" on the top of the seed pack. I used the tube scaled at 30, then sharpened it once. I wanted all three country flower tubes on my seed pack, so I added each in it's own layer. If you want to move one flower to the top, you can go to your layers palette and drag it to the top layer. Don't forget to sharpen each layer if you reduce the tube. Here's what mine looks like: (image reduced for faster loading)
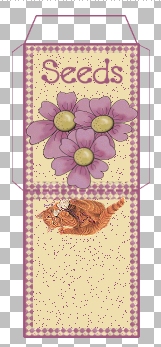
*Add a new raster layer.* Add your text now. If you want to add a tube to the back of the seed pack, add a new raster layer, add your tube, sharpen if reduced, then flip it, sharpen it again and place it on the back of your seed pack. Here's mine now: (image reduced for faster loading)
Now, go to your layers palette and select the outline of the seed pack layer. It should be layer 2. Use your magic wand to select the flap. Hold down your shift key and select the other two flaps. *Add a new raster layer.* Flood fill the flaps with the lighter background color. I used #E9DCA8. Deselect ("Ctrl"..."D".) Merge all layers visible. Export as a jpg with compression of "1." Print out and share those seeds with a friend! **SPECIAL PRINTING NOTE** If you print from your browser, the image will fit on a letter-sized paper. If printing from a saved image in Paint Shop Pro, reduce the size by 70% and sharpen once. See my completed seed pack ready for printing. Follow wompie!
|