Wompie Friendship Quilt Page 4
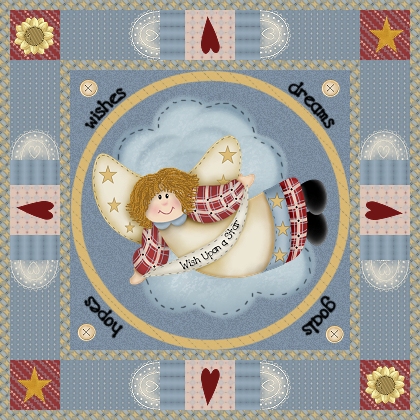
Now we are going to decorate our friendship quilt and add text. Make sure your top layer in your layer palette is active and add a new raster layer. Embellish your quilt with tubes of your choice, each in their own layer. Don't forget to sharpen once if you re-size your tubes. You will need to do a little rotating, flipping, or mirroring of some of the tubes for a symmetrical look. Once you have your embellishments just the way you want them, you may merge all visible layers. ("Layers"..."Merge"..."Merge Visible")
*Add a new raster layer*
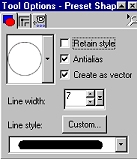
Set your styles and textures palette to a solid color. (I used black.) Use your preset shapes tool with these settings to draw a circle:
Now, use the little handles to stretch the circle out to cover the circle around your center image. Flip the circle. ("Image"..."Flip") In your layers palette, make the layer UNDER the vector active and add a new raster layer. (You can add one quickly by holding your "Shift" key down and clicking on the two little pieces of paper in your layers palette.) Now, make the vector layer active again and go back to your image.
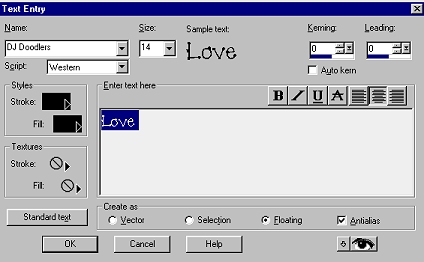
Select your text tool. Hold your mouse over the vector circle until it turns into the letter "A". You can now add your first text. Use these settings: (Please do not email me to ask for the DJ fonts. You must purchase them. You may purchase them here.)
While your text is still selected, move it to the outside of your circle. Use the deformation tool to rotate the text to one corner of either the top left or top right. (Hold your mouse over the selected text after you have clicked the deformation tool. When your mouse pointer turns into two little circular white arrows, you can drag the text to rotate it.) Once you have your text rotated, double-click to set the rotation. Sharpen once. De-select. ("Ctrl"..."D") When the dialog box pops up asking you if you want to de-float down to the nearest raster layer, click "Yes."
Now, add a new raster layer below your vector layer and do the same thing for the other top side text.
When you do the bottom sides texts, you will need to flip and mirror the text before you use the deformation tool. Remember, each text should be in it's own raster layer. Don't forget to sharpen. After you have completed your text, go into your layers palette and delete the vector layer with the circle in it. Now you can move your text if necessary or resize it if it's too big. (If you do resize it, make sure your "Re-size all Layers" box is UN-checked and don't forget to sharpen once.)
I hope you have gained an understanding of how to use coordinates to select geometrical areas, how layers work, and how to make circular text.
Now you're finished and ready to merge all layers visible. This friendship quilt could be used for a variety of projects such as cards, printable boxes or gift bags, web page graphics, or anything your imagination comes up with! Enjoy!
Bring it on home to wompie.